Back to Basics: Creating and Testing a Custom Linked List in Java
In this post, I step through the implementation of a custom linked list using the Java programming language.
I implement the minimal set of methods needed to provide a list data structure that is useful in modern
Java projects. I also show how to define a method to support the Stream<T> interface
introduced in Java 1.8. Finally, I show how to properly test the list data structure using the JUnit
testing framework.
With that said, let's get started.
Prerequisites
- Java, version 1.8 or higher.
- NetBeans IDE: This is my IDE (integrated development environment) of choice. You may use another IDE or text editor if you prefer, but using NetBeans will make this post easier to follow.
- Apache Maven: This is one of the build tools supported by NetBeans. It is also my preferred project build tool.
Implementation
The first step is to start NetBeans and create a new project.
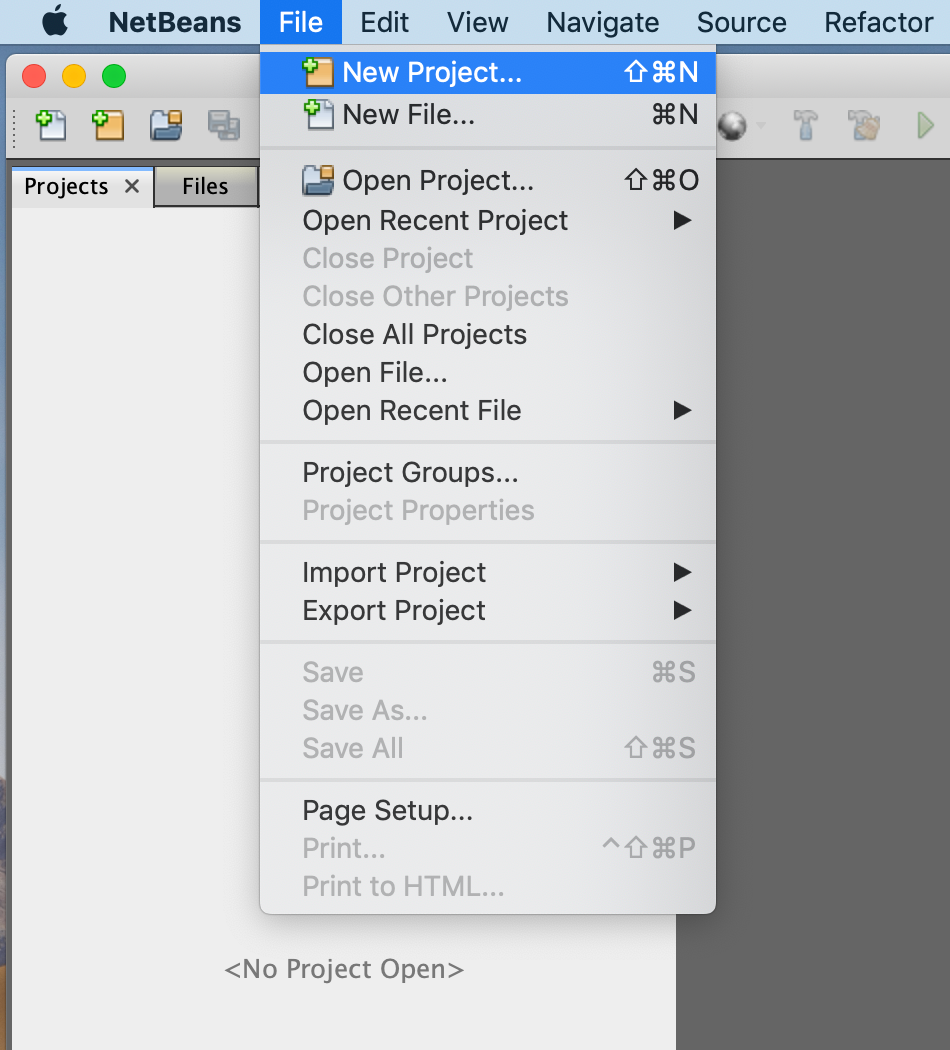
In the "New Project" dialog, choose "Java Application" in the "Java with Maven" category, and click the "Next" button.

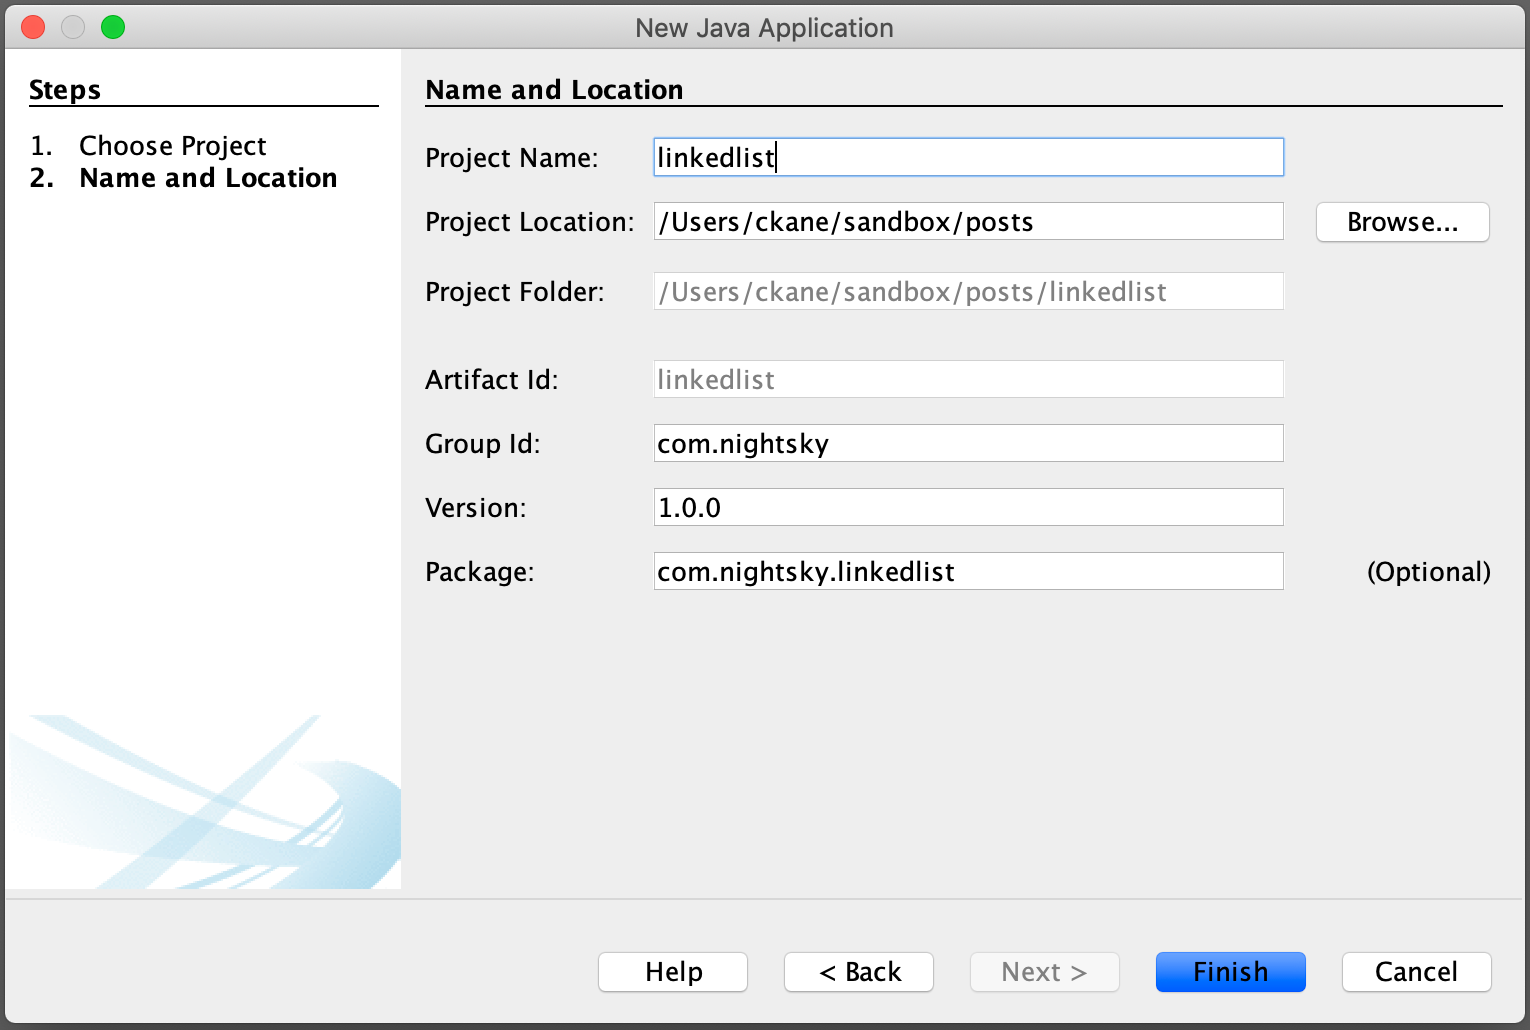
In the "New Java Application" dialog, set the name and location of your project. Also, define your package and artifact details. When you are done, click the "Finish" button.
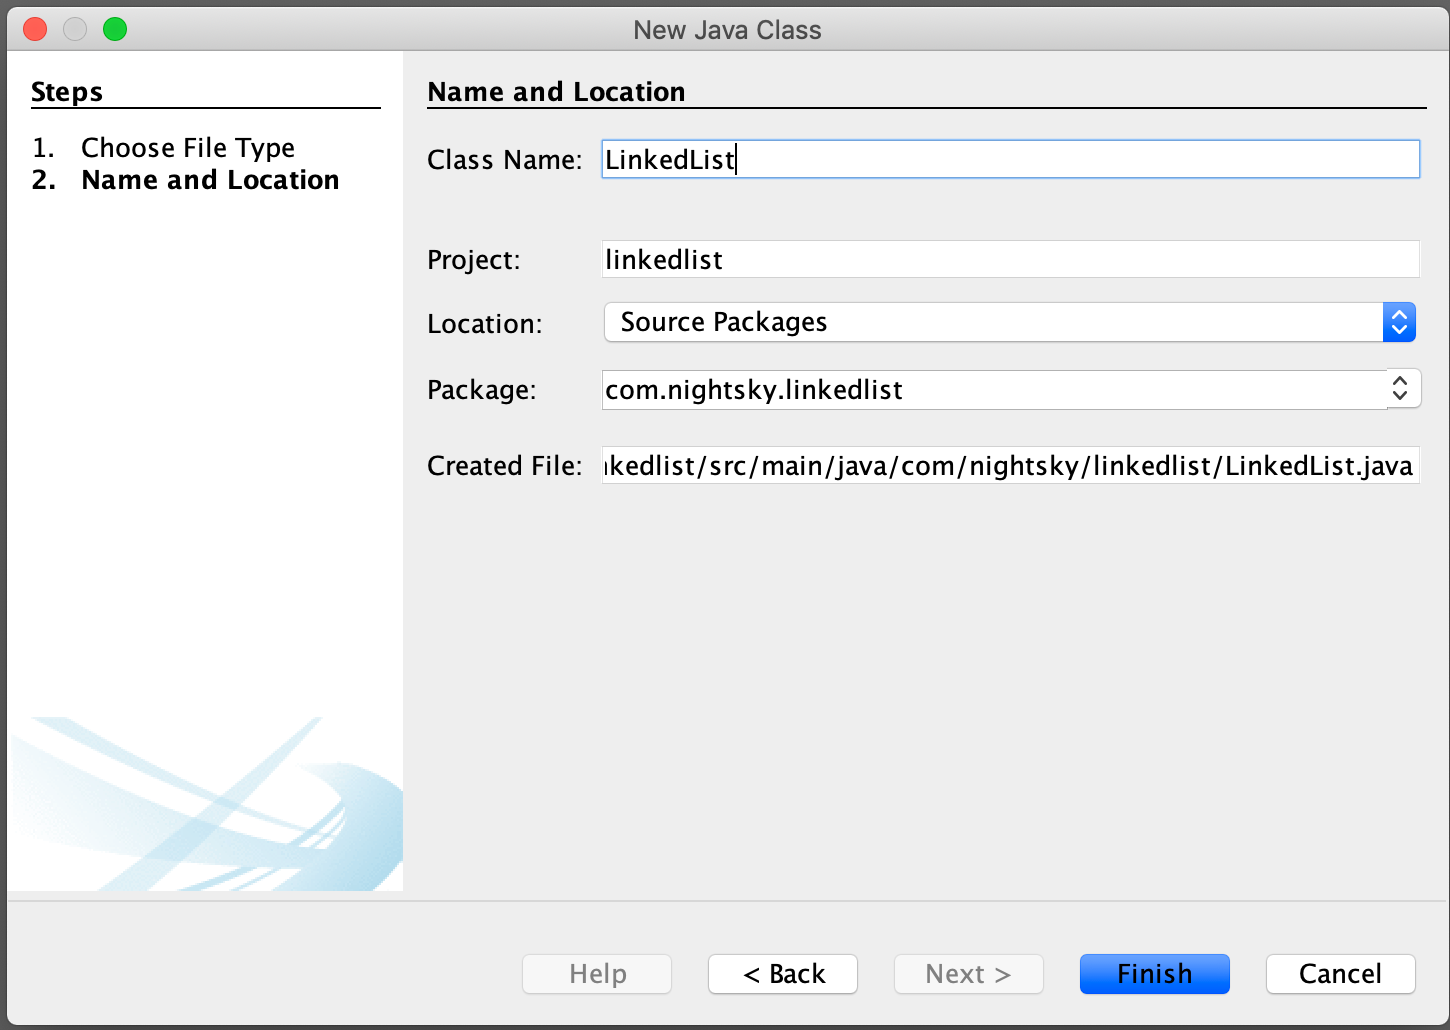
Now that the project is created, we will create a new Java class to represent our custom linked list.
In your project's root package, open the context menu and select "New" → "Java Class".

Name the class "LinkedList". Click the "Finish" button to create the .java file for the new class.
After creating the new class, the contents of the .java file should look something like this:
package com.nightsky.linkedlist;

/**
 * A basic doubly-linked list implementation.
 *
 */
public class LinkedList {

}
The next step is to implement a private class that will represent the internal nodes in the linked list.
Since we are implementing a doubly-linked list, we will need pointers to the previous and next nodes in the list.
We will also need to keep a reference to the value added by the user of our list.
Our completed Node implementation is below. It can be added to LinkedList.java directly.
    /**
     * The internal representation of a linked list node.
     *
     * @param <T> The type of the elements in the list
     */
    private class Node<T> {

        // The previous node in the list, or null if this node is the head
        private Node<T> previous;

        // The next node in the list, or null if this node is the tail
        private Node<T> next;

        // The object represented by this node in the list
        private T value;

        public Node() {
        }

        public Node(Node<T> previousNode, Node<T> nextNode, T nodeValue) {
            this.previous = previousNode;
            this.next = nextNode;
            this.value = nodeValue;
        }

        /**
         * Removes references to encapsulated objects.
         */
        public void removeReferences() {
            this.previous = null;
            this.next = null;
            this.value = null;
        }

        public Node<T> getPrevious() {
            return previous;
        }

        public Node<T> getNext() {
            return next;
        }

        public T getValue() {
            return value;
        }

        public void setPrevious(Node<T> node) {
            this.previous = node;
        }

        public void setNext(Node<T> node) {
            this.next = node;
        }

        public void setValue(T v) {
            this.value = v;
        }

    }
Note that we have made the Node class generic so that our custom linked list can store objects of any type. Also,
note that we have defined a method named removeReferences(). This method will be used when we remove nodes from
our custom linked list. This will help prevent memory leaks when using our custom linked list.
Now that we have defined the internal representation of a linked list node, we can define the instance variables needed to
support our linked list implementation. We will only need three variables. They will store the head of our list, the tail
of our list, and the size of our list. After adding these variables to LinkedList.java, our class now looks like
this:
public class LinkedList<T> {

    private Node<T> head;

    private Node<T> tail;

    private int size;

    // ...

}
Notice that we also added the <T> type definition to the LinkedList class. This is needed
so that our list can be used to store values of any type.
Next, we will define one more private class that is needed for us to support iteration over the elements in our
custom linked list. This class will implement the java.util.Iterator interface.
The complete implementation of this class is given below. Like the Node class above,
it can be added to LinkedList.java directly. Be sure to import the java.util.Iterator
class in LinkedList.java.
    /**
     * The specialized linked list node iterator for our custom linked list.
     *
     * @param <T> The type of the elements in the list.
     */
    private class NodeIterator<T> implements Iterator<T> {

        public Node<T> currentNode;

        public NodeIterator(Node<T> from) {
            this.currentNode = from;
        }

        @Override
        public boolean hasNext() {
            return currentNode != null;
        }

        @Override
        public T next() {
            T nextValue = currentNode.getValue();
            currentNode = currentNode.getNext();
            return nextValue;
        }

    }
With the NodeIterator class complete, we can now make our linked list iterable.
We do this by implementing the Iterable<T> interface. To implement the
Iterable<T> interface, we add an implements clause to our
class definition and add the iterator() and spliterator() methods
to our LinkedList class. LinkedList.java now looks like this:
import java.util.Iterator;
import java.util.Spliterator;
import java.util.Spliterators;

public class LinkedList<T> implements Iterable<T> {

    private Node<T> head;

    private Node<T> tail;

    private int size;

    @Override
    public Iterator<T> iterator() {
        return new NodeIterator<>(head);
    }

    @Override
    public Spliterator<T> spliterator() {
        return Spliterators.spliteratorUnknownSize(iterator(), Spliterator.ORDERED);
    }

    // ...

}
To finish off the scaffoldling for the LinkedList class, let's add a default constructor that will
initialize the instance variables in the class. It will set the head and tail variables
to null (because the list is initially empty) and set the size variable to zero. Here is our implementation
of the default constructor:
    public LinkedList() {
        this.head = null;
        this.tail = null;
        this.size = 0;
    }
Now that the scaffolding is complete, we can begin implementing the instance methods of our custom linked list. The first method we
will need is the size() method. This method is used to obtain a count of the number of elements in the list. This method
should return the value of the size instance variable like so:
    public int size() {
        return size;
    }
Another useful instance method we want to include is the isEmpty() method. This method can be used to check if the list
contains any elements. This method may seem unnecessary because we are exposing the size instance variable via the size()
method, but it is beneficial to include because it will eliminate code duplication and it makes code that uses our
LinkedList class easier to read. The isEmpty() method is easy to implement as it
merely checks if the size of the list is equal to zero.
    public boolean isEmpty() {
        return size() == 0;
    }
With the isEmpty() method in place, we can now define the instance methods that will provide the core functionality of
our list. We begin by defining two methods that can be used to add elements to our list. The first method will add new elements to
the end of our list, and the second method will add new elements to the location (specified as a zero-based index) given by the user.
Their implementations are as follows:
    /**
     * Adds an object to the end of this list.
     *
     * @param value The object to add to the end of this list.
     */
    public void add(T value) {
        if ( isEmpty() ) {
            head = new Node<>(null, null, value);
            tail = head;
        } else {
            Node<T> newNode = new Node<>(tail, null, value);
            tail.setNext(newNode);
            tail = newNode;
        }

        ++size;
    }

    /**
     * Adds an object to the specified location in this list.
     *
     * @param x The index where the object should be added to this list.
     * @param value The object to add to this list.
     */
    public void add(int x, T value) {
        if ( x > size )
            throw new IllegalArgumentException();

        if ( x == size ) {
            // Shortcut for adding to the end of the list
            add(value);
            return;
        }

        Node<T> nodeToShift = head;
        int i = 0;
        while ( i < x ) {
            nodeToShift = nodeToShift.getNext();
            ++i;
        }

        Node<T> newNode = new Node<>(nodeToShift.getPrevious(), nodeToShift, value);

        if ( nodeToShift.getPrevious() != null )
            nodeToShift.getPrevious().setNext(newNode);
        else
            head = newNode;


        nodeToShift.setPrevious(newNode);

        ++size;
    }
If we give users the ability to add elements to our list, we should also give them the ability to remove elements from our list.
We can accomplish this by adding a method named remove. This method should accept the zero-based index of the element
in the list that should be removed. As you can see, its implementation is a bit complex:
    /**
     * Removes the object at the specified location from this list.
     *
     * @param x The index of the object to remove.
     * @return The object that was removed from this list.
     */
    public T remove(int x) {
        if ( x >= size )
            throw new NoSuchElementException();

        Node<T> currentNode = head;
        int i = 0;
        while ( i < x ) {
            currentNode = currentNode.getNext();
            ++i;
        }

        T val = currentNode.getValue();
        Node<T> previous = currentNode.getPrevious();
        Node<T> next = currentNode.getNext();

        if ( previous != null )
            previous.setNext(next);
        else
            head = next;

        if ( next != null )
            next.setPrevious(previous);
        else
            tail = previous;

        // Avoid memory leaks
        currentNode.removeReferences();

        --size;

        return val;
    }
The first thing we do is verify that the user-provided index value is valid. If the index value does not fall in the range of
the indexes of the elements in our list, we throw a NoSuchElementException. Next, we traverse the nodes in our list,
stopping when we reach the node at the index specified by the user. We then save the value of that node so that we can return it
to the user later. We also save references to the previous and next nodes in the linked list. Next, we update the head
of our list if the old head was removed, or we point the previous node at the next node. Similarly, we update the
tail of our list if the old tail was removed, or we point the next node at the previous node. Finally,
we remove object references from the node being deleted, decrement the size of the list, and return the value associated with
the node that was removed.
Now that we can add and remove elements from our list, we need a way for users to retrieve elements that have been added to the list.
The implementation of the get instance method is pretty simple. It is very similar to the remove method, but
it simply returns the value of the node at the specified index instead of removing it.
    /**
     * Retrieves the object in this list at the specified location.
     *
     * @param x The index of the target object.
     * @return The object in this list at the specified location.
     */
    public T get(int x) {
        if ( x >= size )
            throw new NoSuchElementException();

        Node<T> currentNode = head;
        int i = 0;
        while ( i < x ) {
            currentNode = currentNode.getNext();
            ++i;
        }

        return currentNode.getValue();
    }
Users may also wish to change values in our list; so, let's add a set instance method to provide users with
the ability to update values in our list. The implemention is nearly identical to that of the get method, but
instead of calling getValue() on the desired node in our list, we call setValue() instead.
    /**
     * Sets the object at the specified location in this list.
     *
     * @param x The index in this list at which the new object should be placed.
     * @param value The new object to placed at the specified location.
     */
    public void set(int x, T value) {
        if ( x >= size )
            throw new NoSuchElementException();

        Node<T> currentNode = head;
        int i = 0;
        while ( i < x ) {
            currentNode = currentNode.getNext();
            ++i;
        }

        currentNode.setValue(value);
    }
Finally, modern Java collections typically provide a method named stream() that returns an instance of the Stream<T>
interface. Providing such a method is straightforward:
    /**
     * Returns a sequential <code>Stream</code> with this list as its source.
     *
     * @return A sequential <code>Stream</code> over the elements in this list.
     */
    public Stream<T> stream() {
        return StreamSupport.stream(spliterator(), false);
    }
Unit Testing
Now that our LinkedList implementation is complete, we need to test it to ensure it works as expected. We will be using JUnit
and AssertJ as our testing and validation framework. We will use the Java Faker library to generate random data for our unit tests.
Before writing any unit tests, we need to add our testing and validation framework dependencies to our project. This can be done by
opening the pom.xml file in the root of your project directory and adding the following dependencies to
the POM.
            junit
            junit
            test
            4.13.2


            com.github.javafaker
            javafaker
            1.0.1
            test


            org.assertj
            assertj-core
            3.21.0
            test
Now we are ready to create a class to house our unit tests. Create a .java file named LinkedListTest
and annotate the class like so:
import org.junit.runner.RunWith;
import org.junit.runners.JUnit4;

/**
 * Unit tests for our custom LinkedList.
 *
 */
@RunWith(JUnit4.class)
public class LinkedListTest {

}
The @RunWith annotation directs Maven to use JUnit when executing our unit tests.
Next, declare an instance field to store a reference to the Java Faker API and create a constructor for our unit test class that initializes the Faker API. Our unit test class now looks like this:
import com.github.javafaker.Faker;
import org.junit.runner.RunWith;
import org.junit.runners.JUnit4;

/**
 * Unit tests for our custom LinkedList.
 *
 */
@RunWith(JUnit4.class)
public class LinkedListTest {

    private final Faker faker;

    public LinkedListTest() {
        faker = new Faker();
    }

}
Now, we can begin implementing our unit test methods. The first two methods we implement will test the isEmpty() and size()
methods of our LinkedList class.
    @Test
    public void shouldBeEmptyAfterInitialization() {
        LinkedList<String> list = new LinkedList<>();
        assertThat(list.isEmpty()).isTrue();
    }

    @Test
    public void shouldHaveZeroSizeAfterInitialization() {
        LinkedList<String> list = new LinkedList<>();
        assertThat(list.size()).isEqualTo(0);
    }
These two methods test the initial state of the LinkedList after it is constructed. We need to validate that the list has
no elements and a size of zero as one would expect.
To execute these tests in NetBeans, you can select "Run" → "Test Project" from the application menu bar.
If your tests succeed, you should see something like the following in the NetBeans output window.
-------------------------------------------------------
 T E S T S
-------------------------------------------------------
Running com.nightsky.linkedlist.LinkedListTest
Tests run: 2, Failures: 0, Errors: 0, Skipped: 0, Time elapsed: 0.15 sec

Results :

Tests run: 2, Failures: 0, Errors: 0, Skipped: 0
Let's now validate that our add() methods work as expected. We want to be sure that adding an element
results in a list that is no longer empty. We also want to check that the list's size matches the number of elements
we add to it. We also want to verify that adding a new element to a specific location in the list shifts the existing
elements in the list.
    @Test
    public void shouldNotBeEmptyAfterAddingElement() {
        LinkedList<String> list = new LinkedList<>();
        list.add(faker.backToTheFuture().character());
        assertThat(list.isEmpty()).isFalse();
    }

    @Test
    public void shouldHaveSizeOfOneAfterAddingElement() {
        LinkedList<String> list = new LinkedList<>();
        list.add(faker.backToTheFuture().character());
        assertThat(list.size()).isEqualTo(1);
    }

    @Test
    public void shouldHaveExpectedSizeAfterAddingValueAtGivenIndex() {
        String valueToAdd = faker.random().hex(64);
        LinkedList<String> list = new LinkedList<>();
        list.add(faker.backToTheFuture().character());
        list.add(faker.backToTheFuture().character());
        list.add(faker.backToTheFuture().character());
        list.add(2, valueToAdd);
        assertThat(list.size()).isEqualTo(4);
    }

    @Test
    public void shouldShiftExistingElementsWhenAddingValueAtGivenIndex() {
        String valueToAdd = faker.random().hex(64);
        String valueToShift = faker.random().hex(64);
        LinkedList<String> list = new LinkedList<>();
        list.add(faker.random().hex(64));
        list.add(faker.random().hex(64));
        list.add(valueToShift);
        list.add(2, valueToAdd);
        assertThat(list.get(2)).isEqualTo(valueToAdd);
        assertThat(list.get(3)).isEqualTo(valueToShift);
    }
To properly test our LinkedList, we should write unit tests for each of the instance methods we defined. We should validate
that the outcomes of calling the methods are as we expect. I will not post the remainder of the unit tests I wrote for the LinkedList
class, but will instead direct you to review them in the GitHub repository
I created for the source code for this tutorial.
Conclusion
In this post, I have shown how to implement a custom linked list using the Java programming language.
I have also shown how to go about writing unit tests for the linked list class. I hope that
you have found this post helpful.
